After playing Super Robot War for a while, I started to notice that the in-game conversation between mission to mission can sometime be hinting what will be expected in the next release. In example, as I was playing Alpha 3 a while ago, the theme of this game is called At The Galaxy End, which is the same phrase that appeared in the in-game conversation in Super Robot War MX.
I've played Super Robot War MX first before playing Alpha 3, but have never really read the conversation properly. Until I replayed the MX again, I found out that the in-game conversation did mentioned about At The Galaxy End, a conversation between Zero (villain from Dendoh) and the boss of Chronos (from Machine Robo: Revenge of Chronos), where the boss of Chronos telling Zero that the each universe would come to meet its end, hence using the phrase At The Galaxy End, which is the reason why the Chronos has been harvesting the necessary power to do the dimension jumping from one dimension to another dimension in order to survice through that catastrophe end. Then come Super Robot War Alpha 3: At The End of Galaxy, which basically is based on the theme where the heroes have to face that catastrophe end ignited by the endless power of Ide (from Ideon).
Then Super Robot War Alpha 3 did have a special stage where we get to see all the original characters playing together, which gives some hint that the next game is going to be released would be based on the original character, hence Super Robot War OGs (a remake of OG and OG2 of gameboy), which later they did came out with the game.
Then in OGs, there are mentioning of Dai-Rai-Oh (the main super robot character in Alpha 3), which Ryusei Date said of as a super robot focuses more on kicking style attack, which has already appeared in Alpha 3, then in OGs Gaiden, Touma the pilot of Dai-Rai-Oh appeared, which certainly hinting it will be appearing in the future installment, which it would in the upcoming OGs 2.
Not only that, but OGs did link to other Super Robot War game as well, such as Mugen No Frontier & Mugen No Frontier Exceed, where the W series that being mentioned in the early part of OGs 2 appeared, and also the plan EF (Endless Frontier) drafted by Lemon Browning mentioned by Axel Almer in the end of OGs Gaiden also is referring to the Mugen No Fronter series, which Axel Almer appeared in the 2nd installment.
And finally, there's a mentioning of Exbein, which simply referred to as EX in the in-game conversion in OGs Gaiden. At first I don't really understand what it means, but after the released of Exbein, and as I was playing the game again, I realized that the EX mentioned is indeed referring to Exbein. It is also the same in Super Robot War Z, where there are references made to character i.e. Ryouma of Getter Robo that his counterpart in another dimension/parallel world is much more violent than he is, which that version of Ryouma appeared in Super Robot War Z 2.
Although it is easy to say that these are the things that we should have expected from game maker, but like Banpresto that's making such a hint by nicely blending it into the in-game conversation? That I would say is a clever move. Unfortunately since it is only available in Japanese, therefore only the Japanese would know what is going on. Nevertheless, this is also one of the reason why I'd never get bored with Super Robot War because you could expect quite a lot of things by piecing the puzzle here and there, much like reading the Bible.
Friday, July 27, 2012
RG 1/144 RX-78-2 Gundam
This is the first RG and the first snap-fit only kit that I've done. The purpose of this build is to see how far can a snap-fit Gundam kit to go. It is also a good opportunity to learn new thing as well, such as applying shading by using only Real Touch Marker produced by Mr Hobby.


The time taken to finish building this snap-fit only kit and shading with Real Touch Marker is about 1 month. It is not a easy process indeed because the sanding of the parting line, and the nib mark have to be done carefully to avoid any obvious sanding mark. The other thing that's taking it such a long time to do is because of the tremendous detail on this kit, which have caused me to use about 4 Real Touch Marker blender just to blend the marker into the body to create the shading effect. However, it is not that easy to do but it is achievable with patience.
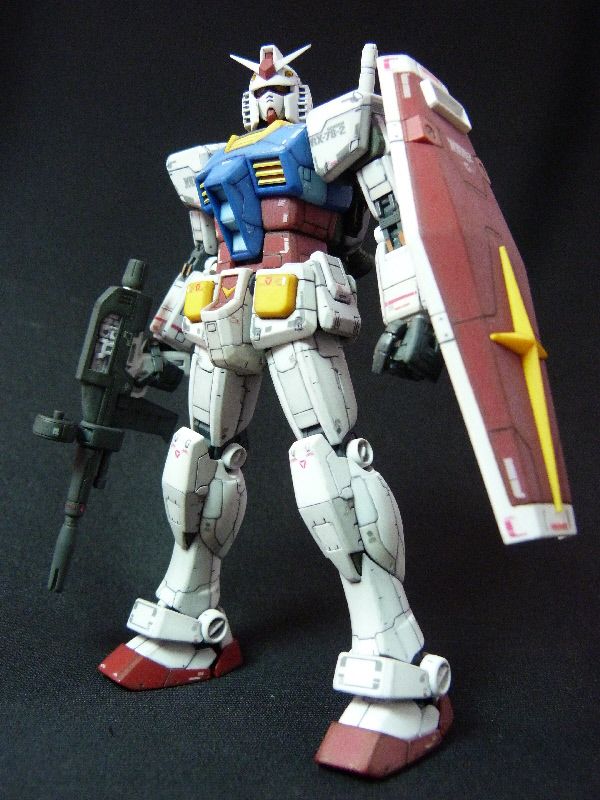
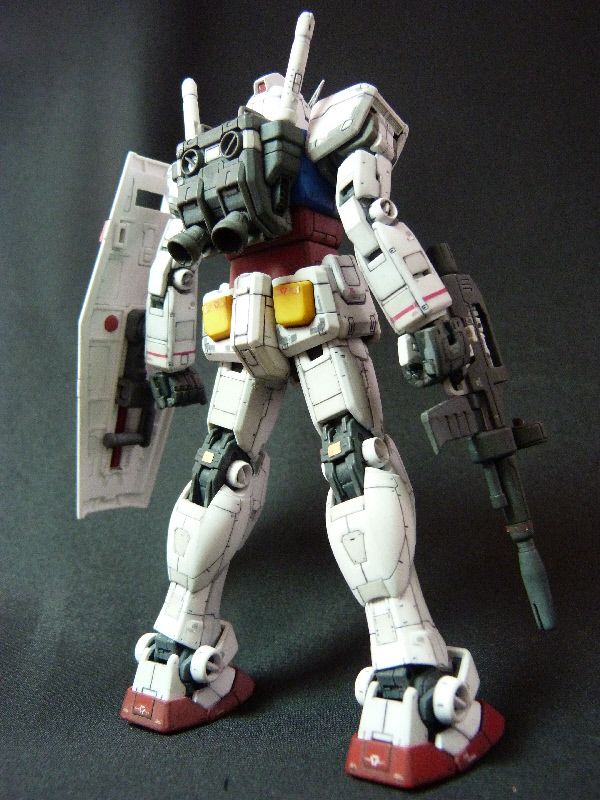
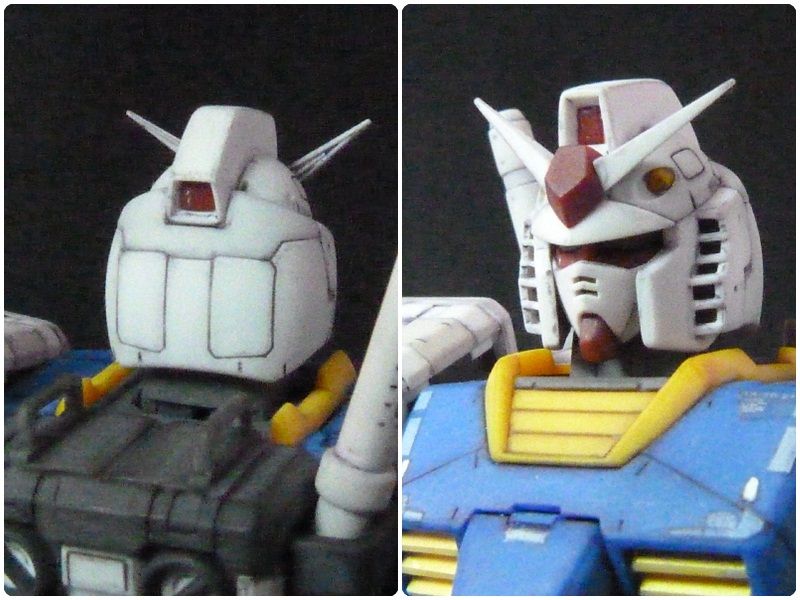
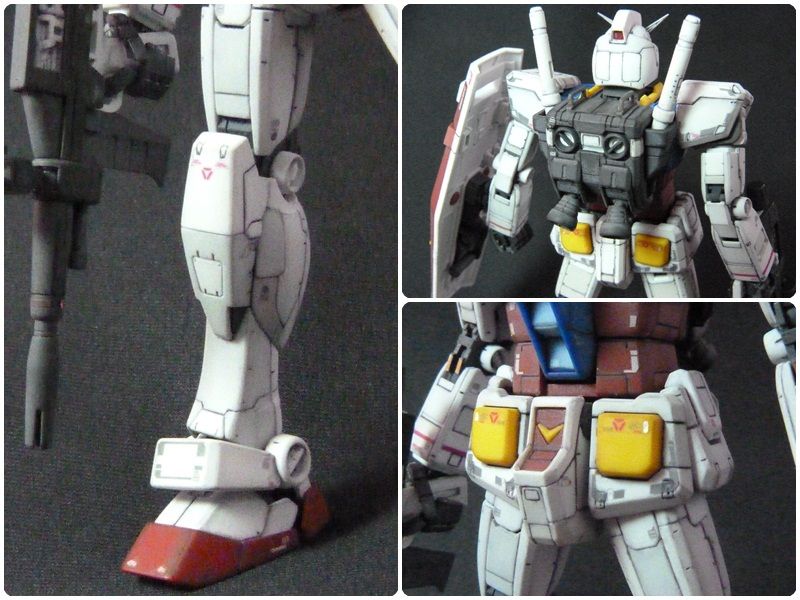
The time taken to finish building this snap-fit only kit and shading with Real Touch Marker is about 1 month. It is not a easy process indeed because the sanding of the parting line, and the nib mark have to be done carefully to avoid any obvious sanding mark. The other thing that's taking it such a long time to do is because of the tremendous detail on this kit, which have caused me to use about 4 Real Touch Marker blender just to blend the marker into the body to create the shading effect. However, it is not that easy to do but it is achievable with patience.

Monday, May 07, 2012
Gamers' Workhop: Blood Bowl Team High Elves
As I've mentioned before that I'm not really a fan of fantasy game, so I don't really know much about them. I was introduced to this game called Blood Bowl, which consists of a few races of fantasy races to compete against each other in a game of American Football, except that it's much more violent. Heard that it's a board game that exists for a long time, where it is played with miniature figures.
I decided to go with High Elves team because that's the one that's the one that I feel more comfortable with. 1 team required 11 figures to start, so my friend managed to help me to get 1 extra because the box of High Elves that I got has only 10 figures. The box set that I used is called the High Elves White Lion of Charice, produced by Gamers Workshop.
In order to have it conforms to Blood Bowl, I have to cut out all the weapon that they're holding because the boxset is produced for war gaming purpose. Some pictures of the finishing products.


The fun part of building this thing is that it's so small and yet it's capable of producing a lot of possible poses. I do enjoy building these figures. As for the painting, it's quite a challenge because not only that it's small, there are some parts that cannot be reached, so will need to plan the painting more carefully.
I learned something new via this build, which is a technique called layering, which is basically a painting way to create a transition between 2 color tones. I also learned that it's not necessarily to use washing to achieve the enhancement of details, which it can be done equally good with only painting & blending of colors if it is done correctly.
In a nutshell, doing this thing really is an eye opening experience for me to painting, and some in depths on how critical it can be that adding shadow could add more depths to a piece of painting.
I decided to go with High Elves team because that's the one that's the one that I feel more comfortable with. 1 team required 11 figures to start, so my friend managed to help me to get 1 extra because the box of High Elves that I got has only 10 figures. The box set that I used is called the High Elves White Lion of Charice, produced by Gamers Workshop.
In order to have it conforms to Blood Bowl, I have to cut out all the weapon that they're holding because the boxset is produced for war gaming purpose. Some pictures of the finishing products.
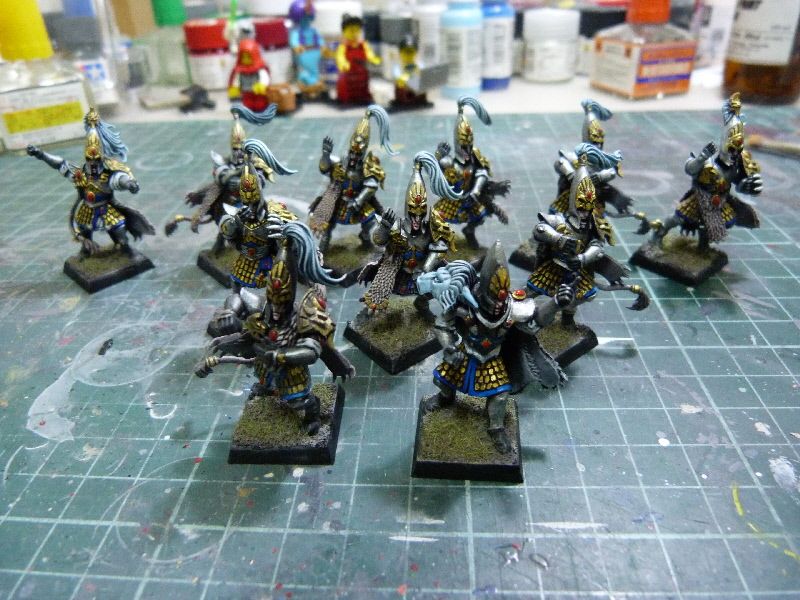
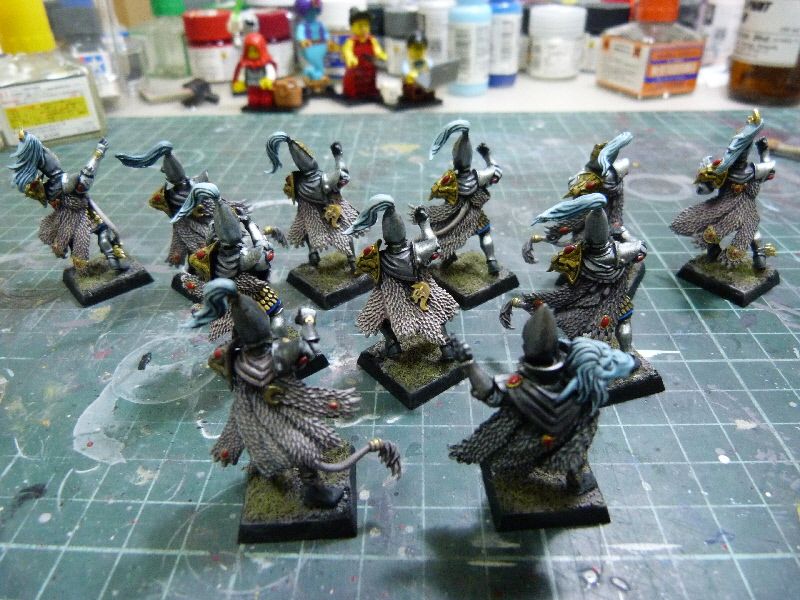
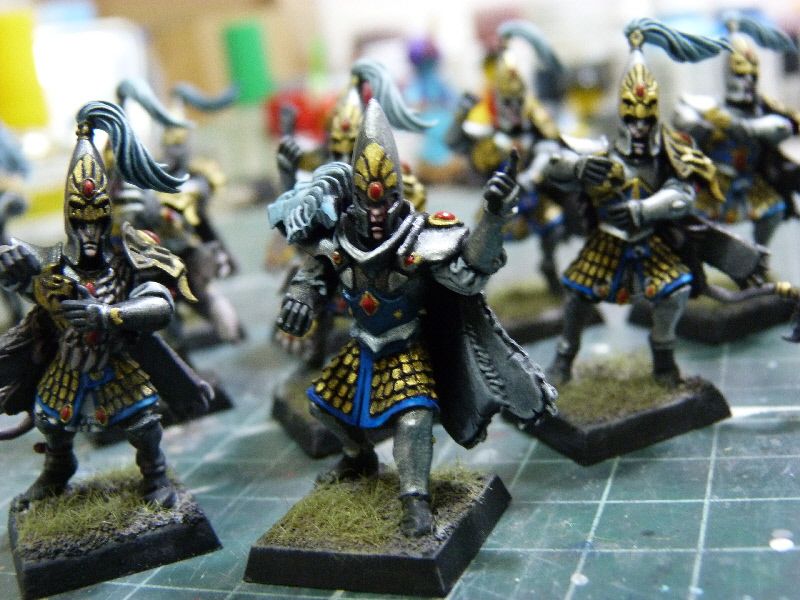
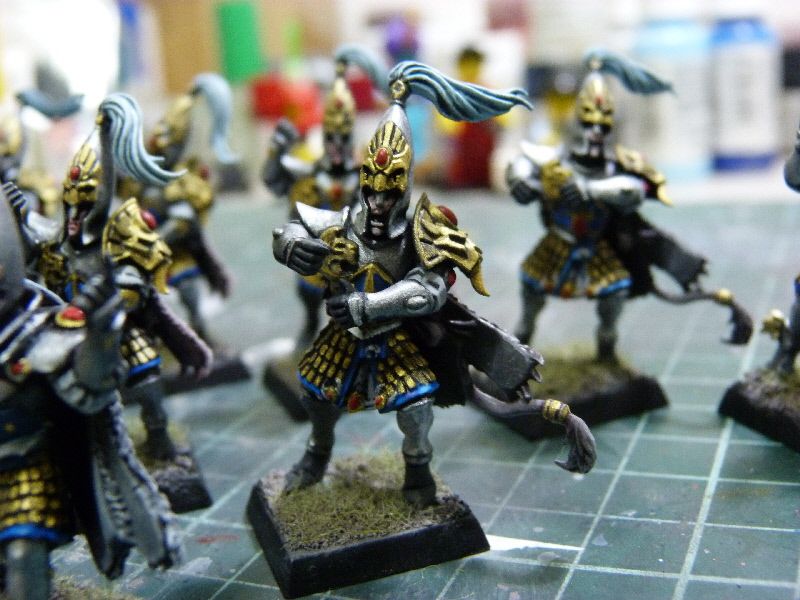
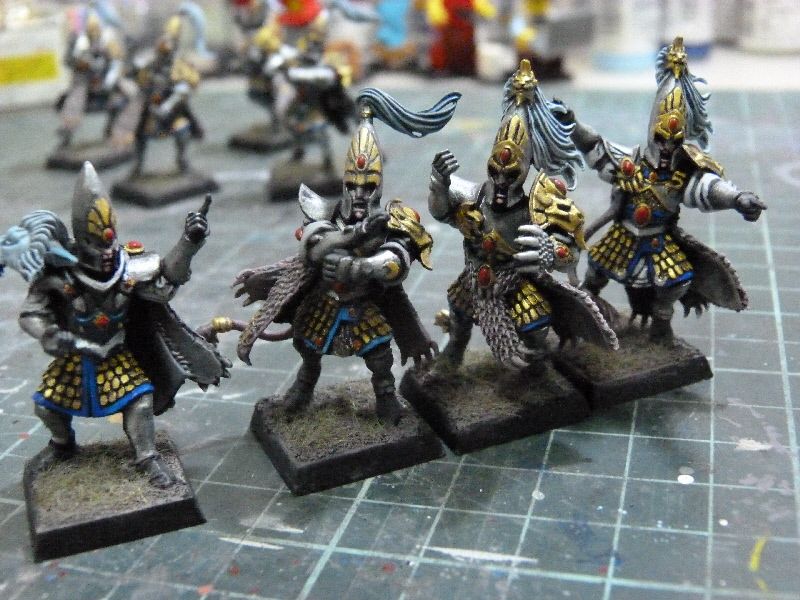
The fun part of building this thing is that it's so small and yet it's capable of producing a lot of possible poses. I do enjoy building these figures. As for the painting, it's quite a challenge because not only that it's small, there are some parts that cannot be reached, so will need to plan the painting more carefully.
I learned something new via this build, which is a technique called layering, which is basically a painting way to create a transition between 2 color tones. I also learned that it's not necessarily to use washing to achieve the enhancement of details, which it can be done equally good with only painting & blending of colors if it is done correctly.
In a nutshell, doing this thing really is an eye opening experience for me to painting, and some in depths on how critical it can be that adding shadow could add more depths to a piece of painting.
Bandai PG 1/60 Gundam Astray Red Frame (friend's)
This is my second PG Red Frame that I helped my friend to build. I won't be talking much about it as I've already done so with my previous PG Red Frame. What I intended to do on this one is to improve it as compare to my previous build. So in this build, I tried to apply a few techniques that I learned since joining the Gunpla modelling community. Some pictures of the finishing product.


In this build I tried to apply shading, dry brushing & washing because through all my previous build, I find that these techniques are very useful and could add more depths to the overall finishing, i.e. enhancing the details. I also tried to improve on the shining metal parts by using other brand of paint, which in this case it's Gaia Notes gold and silver. Both give superb finishing.
Overall, I'm pleased with the outcome even though I felt that it can still be improved, but am glad that at least there are improvements over my previous build.

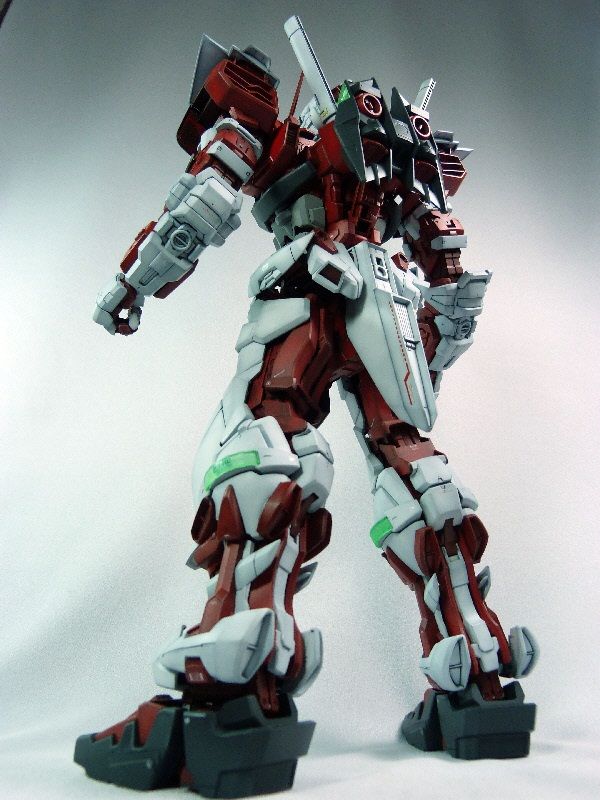
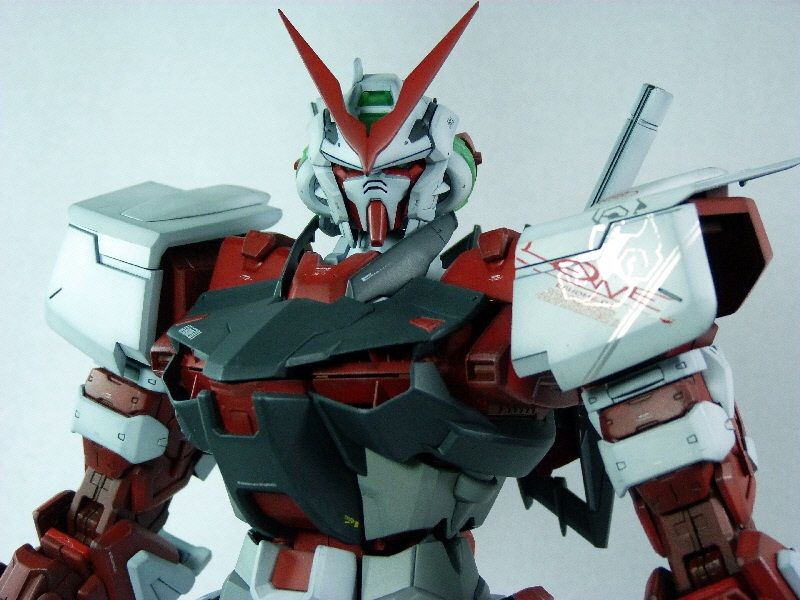
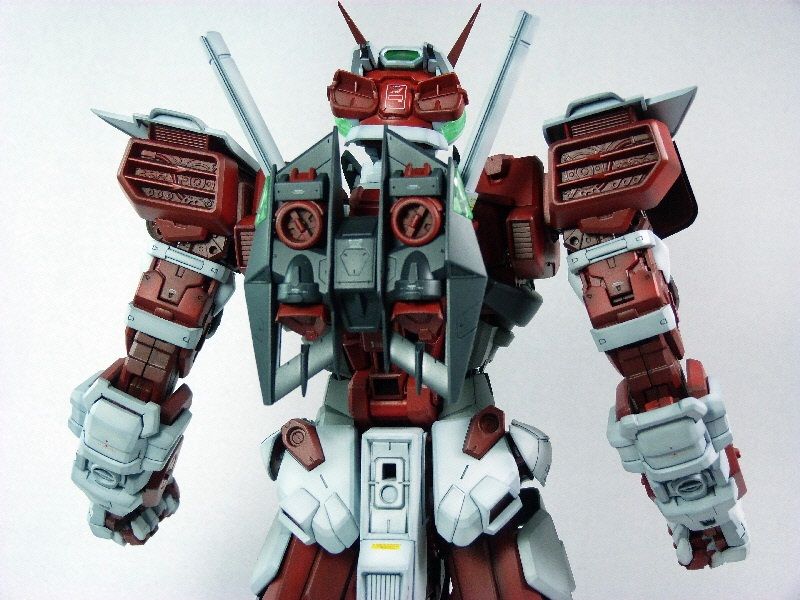
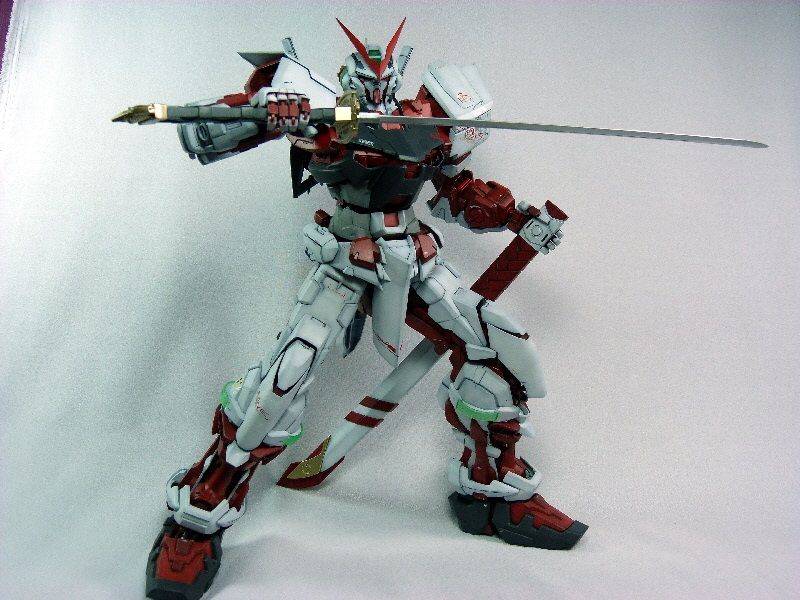
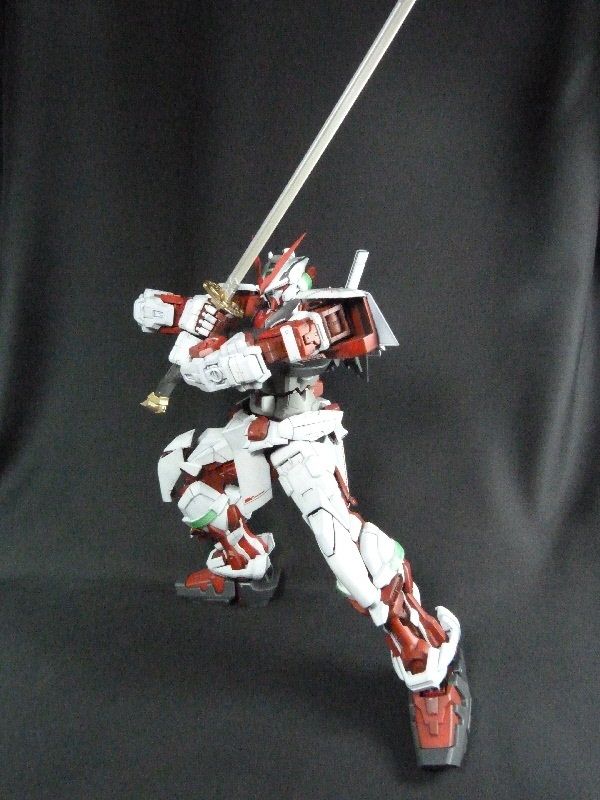
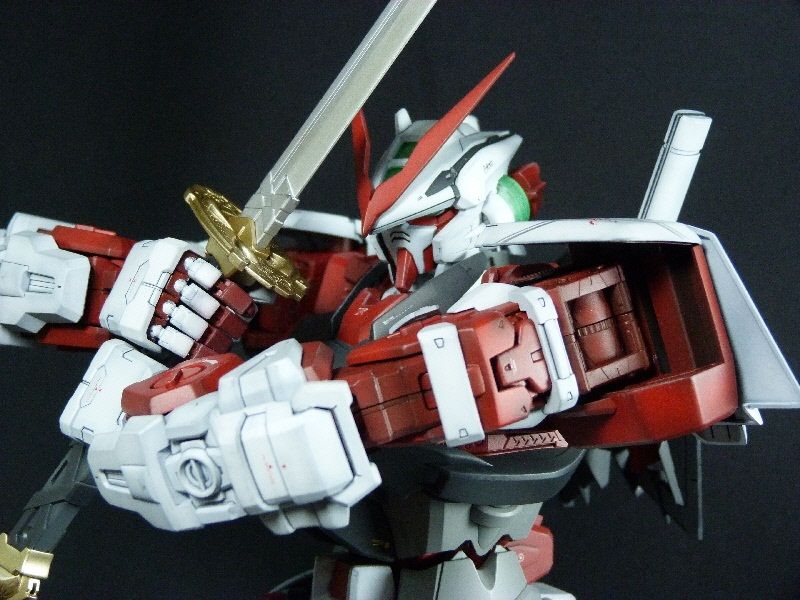
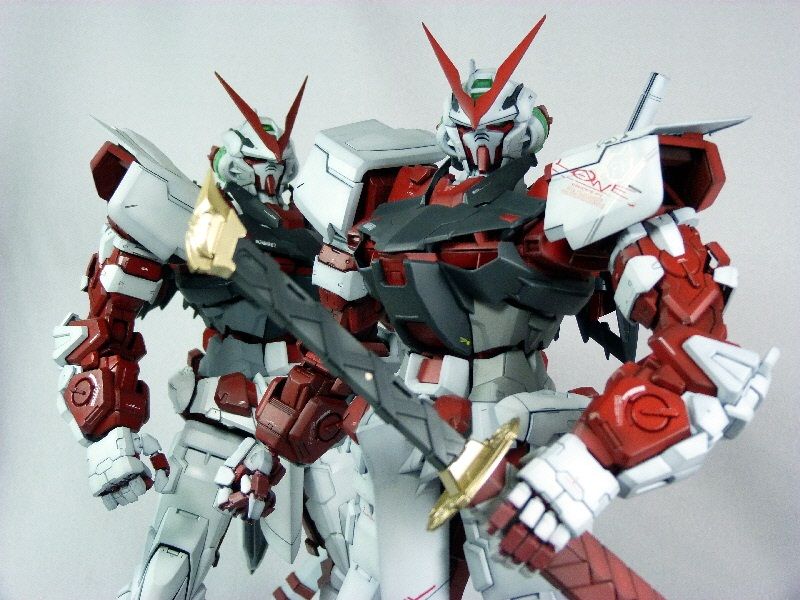
In this build I tried to apply shading, dry brushing & washing because through all my previous build, I find that these techniques are very useful and could add more depths to the overall finishing, i.e. enhancing the details. I also tried to improve on the shining metal parts by using other brand of paint, which in this case it's Gaia Notes gold and silver. Both give superb finishing.
Overall, I'm pleased with the outcome even though I felt that it can still be improved, but am glad that at least there are improvements over my previous build.
Warhammer Terrain - Fortified Manor
I was introduced to miniature figures of Warhammer by a friend that I met through Gunpla modelling. Even though I was not really into fantasy war board game, yet I have the opportunity to work on this terrain from the Warhammer game produced by Citadel.

This terrain costs about 46 GBP, so it's a lot of money there. My first impression when I received the kit was "how am I going to build it?" Because in comparison with scale model or even Gunpla, it's a totally different approach, where it does require some in dept in my opinion to have it painted nicely. So it's quite a challenge to build it.
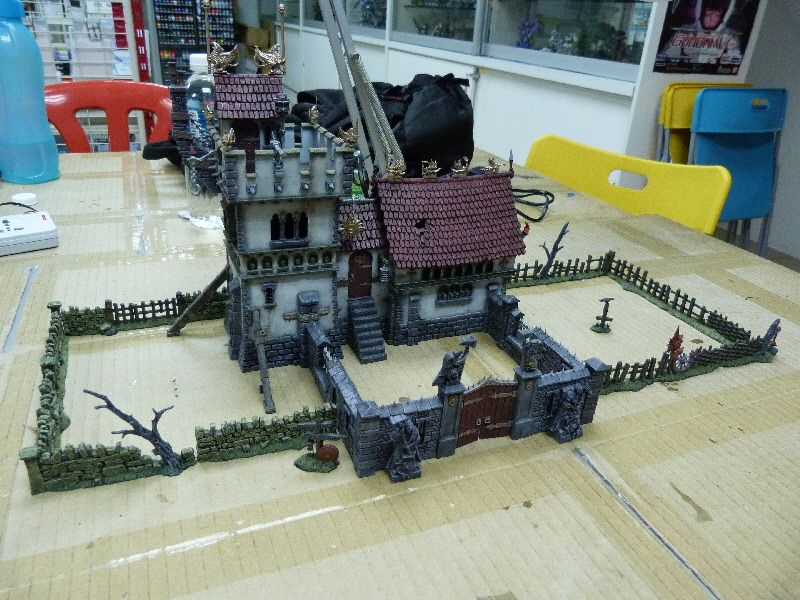
As shown in the picture, it consists of a tower, a main chapel, stone fences & wood fences. Unlike Gunpla, where each part has to be painted separately only then assembled together, this terrain can be assembled first only then do the overall painting.
The type of color that I used on this kit is lacquer with acrylic. The lacquer colors that I painted are white and red, and I did the different tone of red on the roof with lacquer as well. As for the other colors, I used mainly acrylic, specifically artist acrylic borrowed from my friend. As for the final layer of washing, I used enamel paint instead.
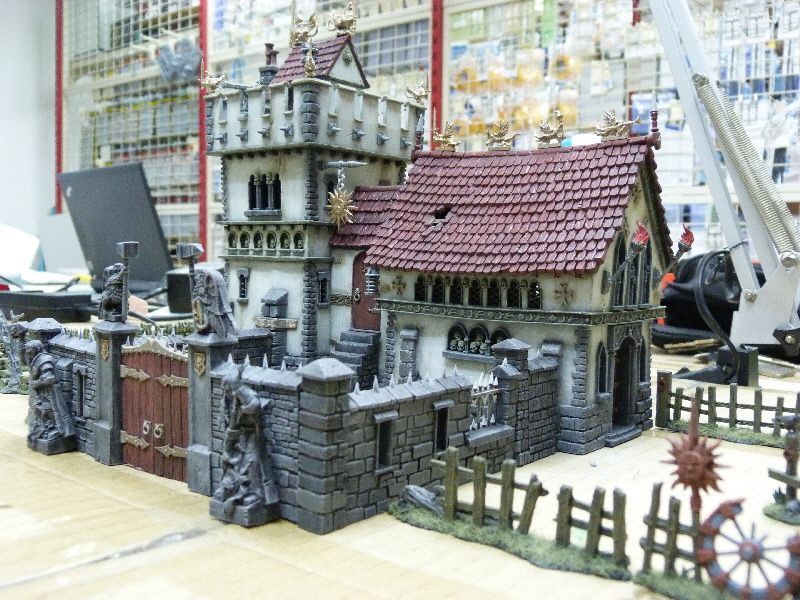
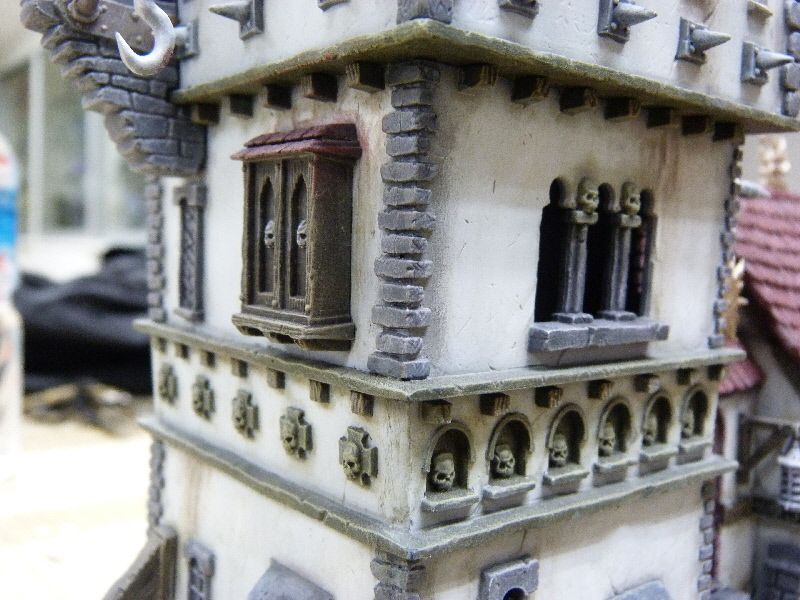
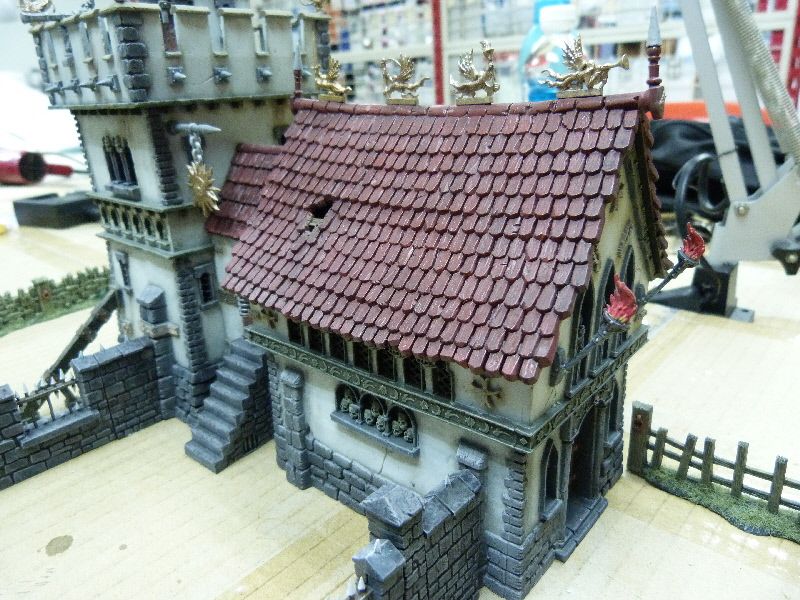
The technique that I used & still learning in application to the painting is mostly dry brushing & washing. Dry brushing is to enhance the raised details of a surface, i.e. edges of rough stones, while washing is to raised details of sunken surface i.e. the gap between stone, or to create dirt effect i.e. water stain. Some pictures of how the finishing product looks like in up close.


Overall, it's really interesting to work on this terrain, and it's really fun to work on it because the painting is really fun especially after seeing how it turns out at the end. The whole thing does not require much sanding work like Gunpla because terrain not necessarily in good shape all the time, so it's alright to have some mishap.
I was happy on seeing how it turns out because it's enjoyable when seeing the product turns out nicely. I also very thankful that the friend who gave me this terrain to work on gave me pointers on how to improve on my weathering, as a result that now and then I'd observe how structures or objects around me to get some ideas on how to do weathering on my next project.
This terrain costs about 46 GBP, so it's a lot of money there. My first impression when I received the kit was "how am I going to build it?" Because in comparison with scale model or even Gunpla, it's a totally different approach, where it does require some in dept in my opinion to have it painted nicely. So it's quite a challenge to build it.
As shown in the picture, it consists of a tower, a main chapel, stone fences & wood fences. Unlike Gunpla, where each part has to be painted separately only then assembled together, this terrain can be assembled first only then do the overall painting.
The type of color that I used on this kit is lacquer with acrylic. The lacquer colors that I painted are white and red, and I did the different tone of red on the roof with lacquer as well. As for the other colors, I used mainly acrylic, specifically artist acrylic borrowed from my friend. As for the final layer of washing, I used enamel paint instead.
The technique that I used & still learning in application to the painting is mostly dry brushing & washing. Dry brushing is to enhance the raised details of a surface, i.e. edges of rough stones, while washing is to raised details of sunken surface i.e. the gap between stone, or to create dirt effect i.e. water stain. Some pictures of how the finishing product looks like in up close.
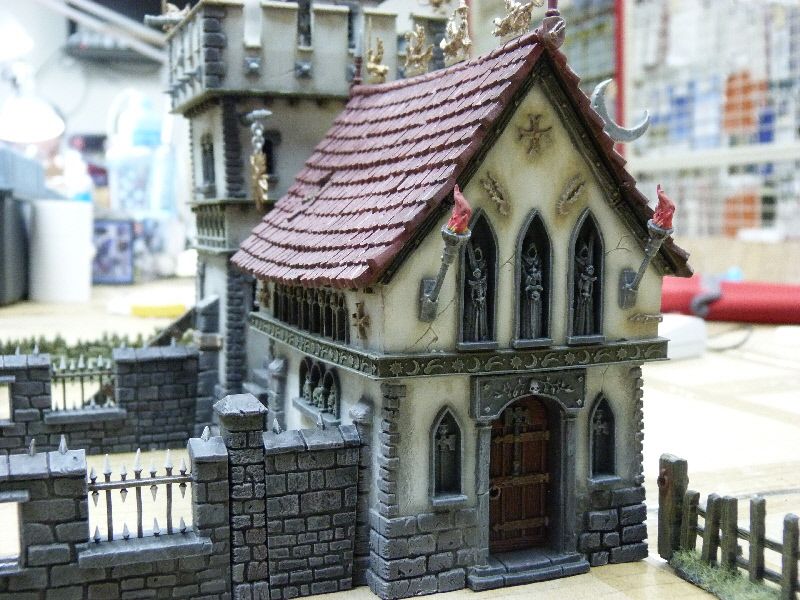
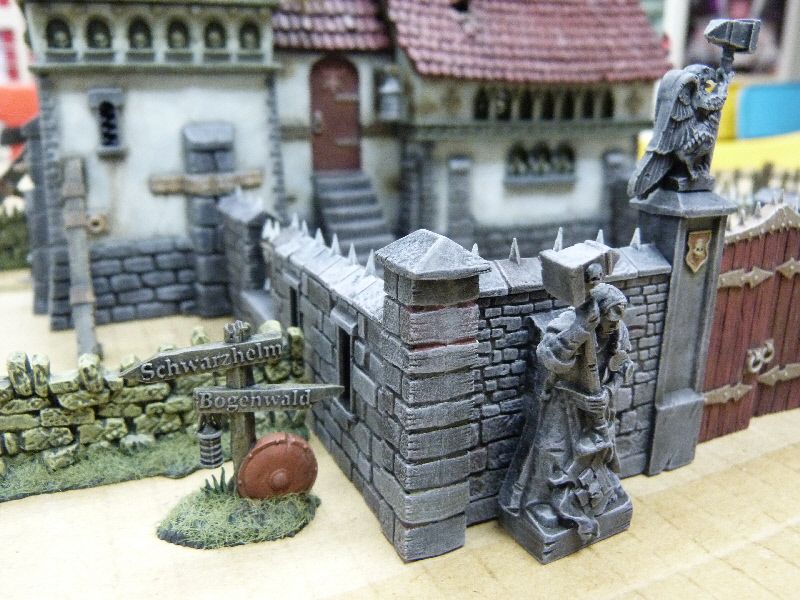
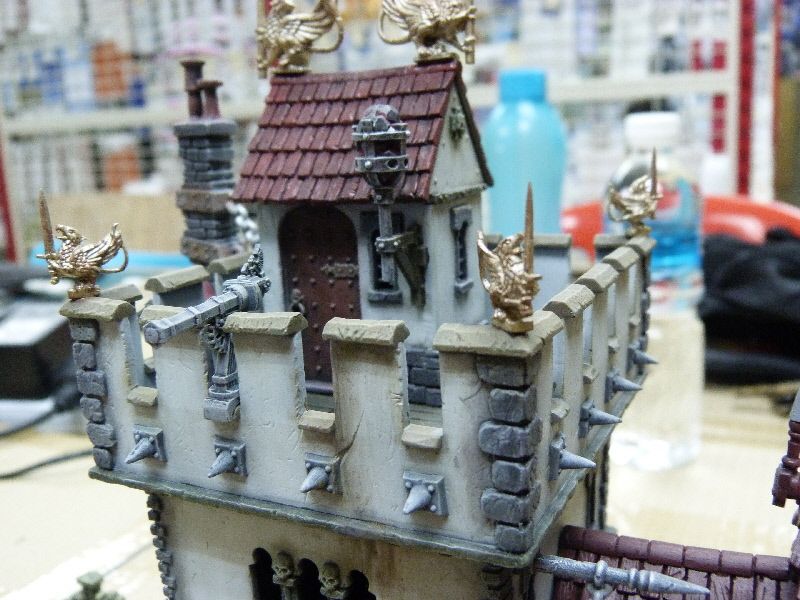
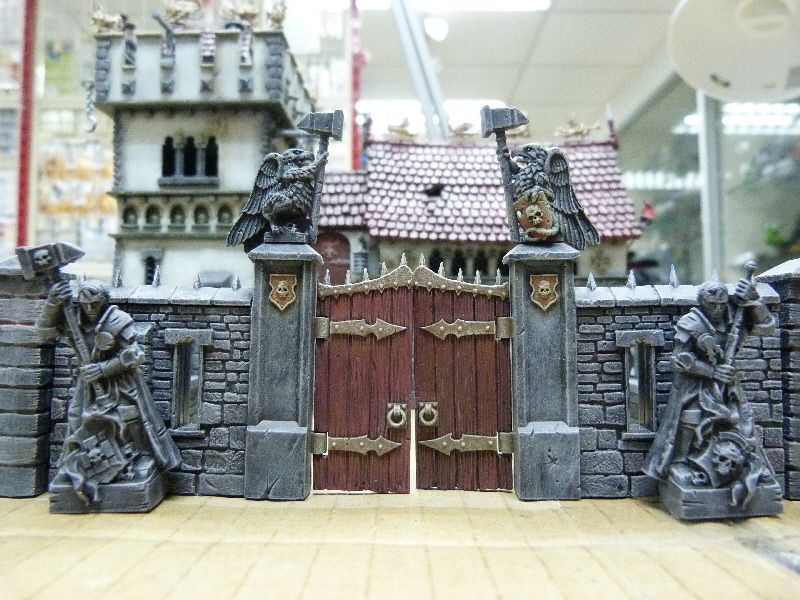
Overall, it's really interesting to work on this terrain, and it's really fun to work on it because the painting is really fun especially after seeing how it turns out at the end. The whole thing does not require much sanding work like Gunpla because terrain not necessarily in good shape all the time, so it's alright to have some mishap.
I was happy on seeing how it turns out because it's enjoyable when seeing the product turns out nicely. I also very thankful that the friend who gave me this terrain to work on gave me pointers on how to improve on my weathering, as a result that now and then I'd observe how structures or objects around me to get some ideas on how to do weathering on my next project.
Tuesday, December 27, 2011
Bandai 1/100 MG MSZ-006 Zeta Gundam Version 2.0
This can be considered as the last kit that I finished for the year 2011. This is the upgraded version of the previous MG 1/100 Zeta Gundam released back in the 90's. The upgrade to the previous version includes a much better inner frame & transformation gimmick, plus a better proportion (in my opinion) and better articulation, esp. the waist.

What I did with this kit, is my usual out of the box build with the original color scheme, but with some minor experiment in detail up for this is the first time I used metal parts but only in the mega beam launcher, and also my second try on custom decal instead of using the included decal because the decal included with the kit is the marking decal (sticker type) and the dry transfer decal, which I'd personally prefer water-slide.


The posing of this kit is advised and done by a fellow modeller that I knew in Zero-G forum, who's a very good modeller and has a great sense of vision in creativity. I did planned to use this kit to enter into this year GBWC 2011 Malaysia together with the MK-II Gundam that I did previously in a diorama set piece. The result is like in the following photo.

It is not easy to do a diorama because of the sense of space and also the message that I tried to deliver to the viewers. Plus, there's something really bad happened to this set because of the internal heat cause by the spot light that's causing the base to wobble. Realized it too late, but at least gained experience that next time I'll need to do more planning.
After this year competition, I'd try to come out with a work that's cater for the competition because I usually only do out of the box build, of which it's not going to go any further in the competition due to the high standard that's been set by all previous modellers that joined the competition. Plus, I don't believe that standard should be compromised at all cost, so I'll try to step it up this time to see how far I could go. The coming build for 2012 shall be my first (and hopefully the last) to be competitive in modelling, I hope...
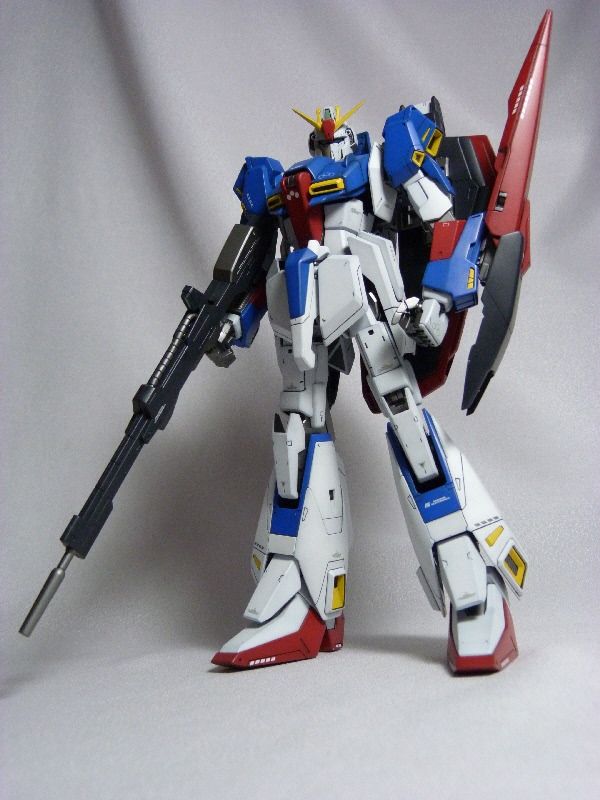
What I did with this kit, is my usual out of the box build with the original color scheme, but with some minor experiment in detail up for this is the first time I used metal parts but only in the mega beam launcher, and also my second try on custom decal instead of using the included decal because the decal included with the kit is the marking decal (sticker type) and the dry transfer decal, which I'd personally prefer water-slide.
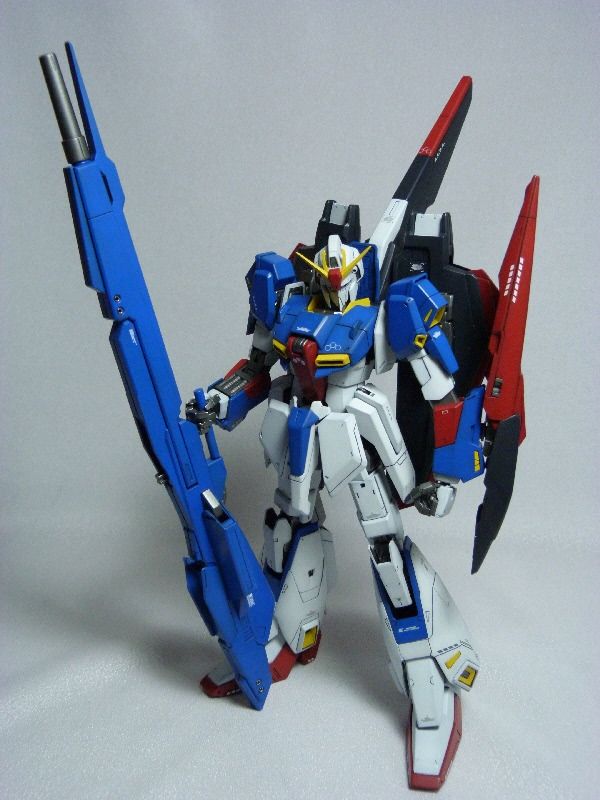
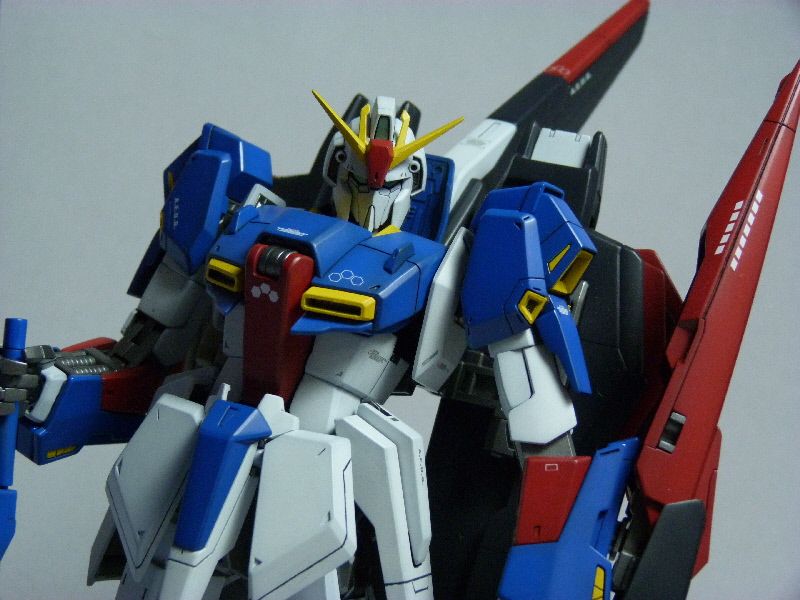
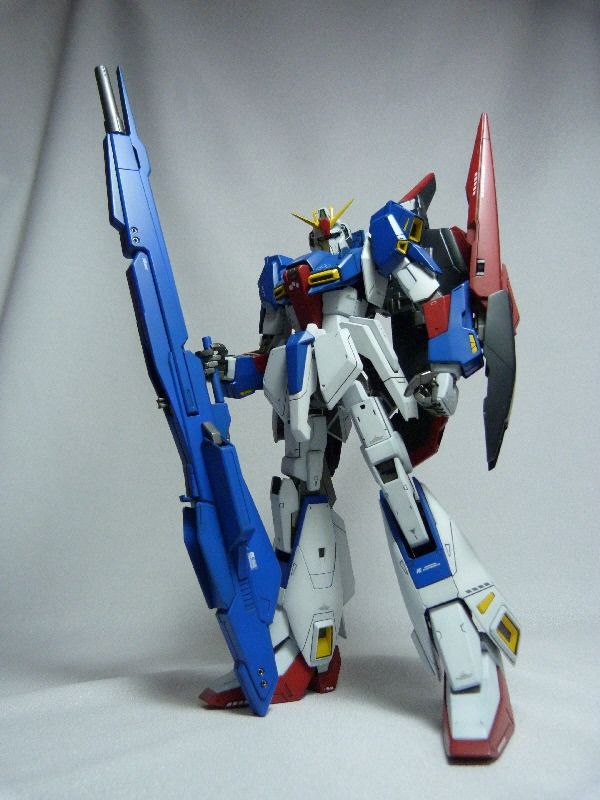
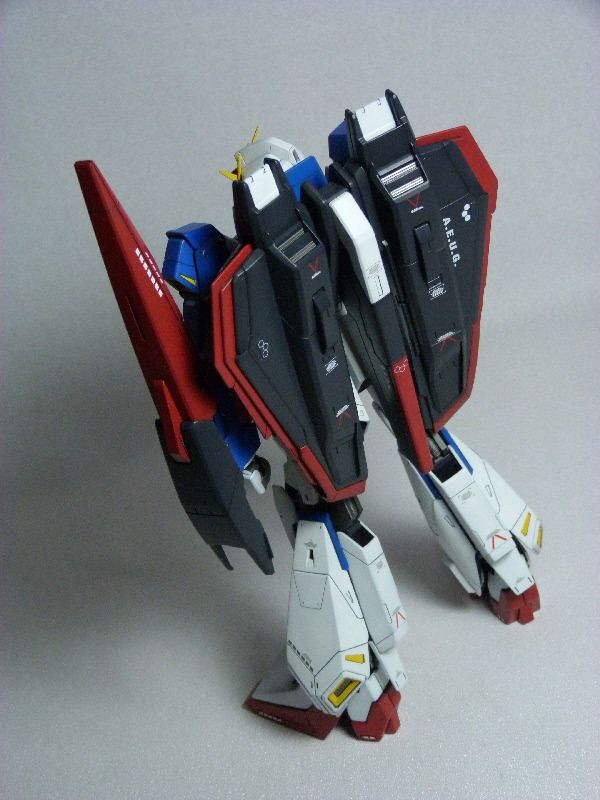
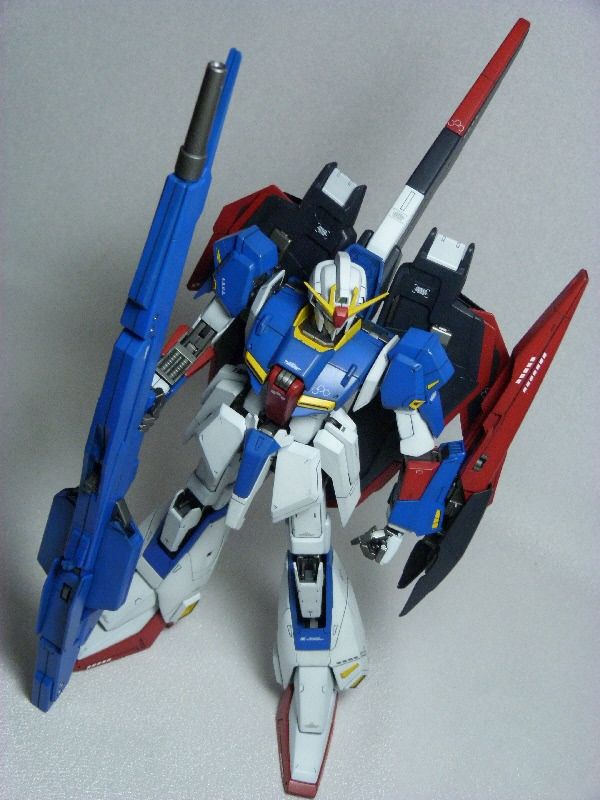
The posing of this kit is advised and done by a fellow modeller that I knew in Zero-G forum, who's a very good modeller and has a great sense of vision in creativity. I did planned to use this kit to enter into this year GBWC 2011 Malaysia together with the MK-II Gundam that I did previously in a diorama set piece. The result is like in the following photo.
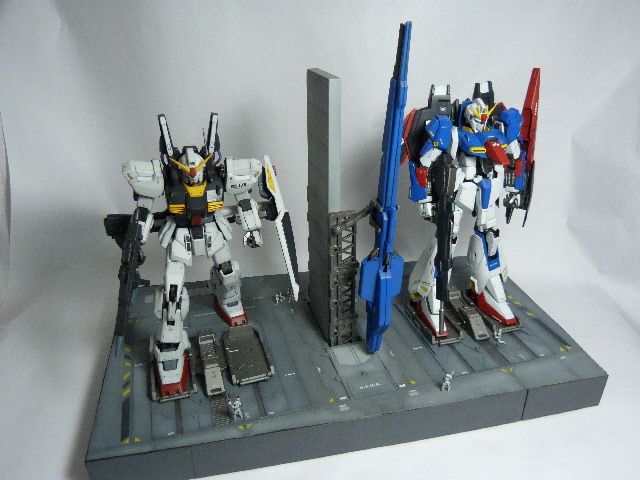
It is not easy to do a diorama because of the sense of space and also the message that I tried to deliver to the viewers. Plus, there's something really bad happened to this set because of the internal heat cause by the spot light that's causing the base to wobble. Realized it too late, but at least gained experience that next time I'll need to do more planning.
After this year competition, I'd try to come out with a work that's cater for the competition because I usually only do out of the box build, of which it's not going to go any further in the competition due to the high standard that's been set by all previous modellers that joined the competition. Plus, I don't believe that standard should be compromised at all cost, so I'll try to step it up this time to see how far I could go. The coming build for 2012 shall be my first (and hopefully the last) to be competitive in modelling, I hope...
Thursday, October 20, 2011
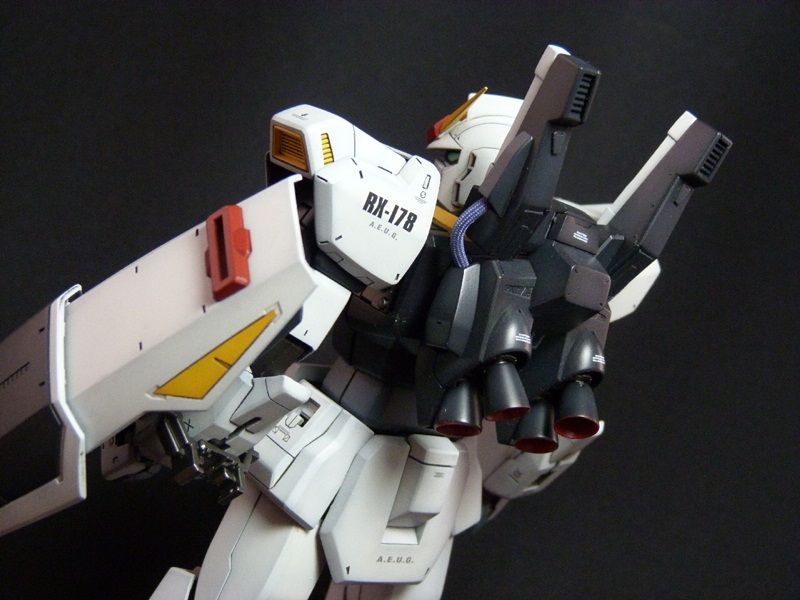
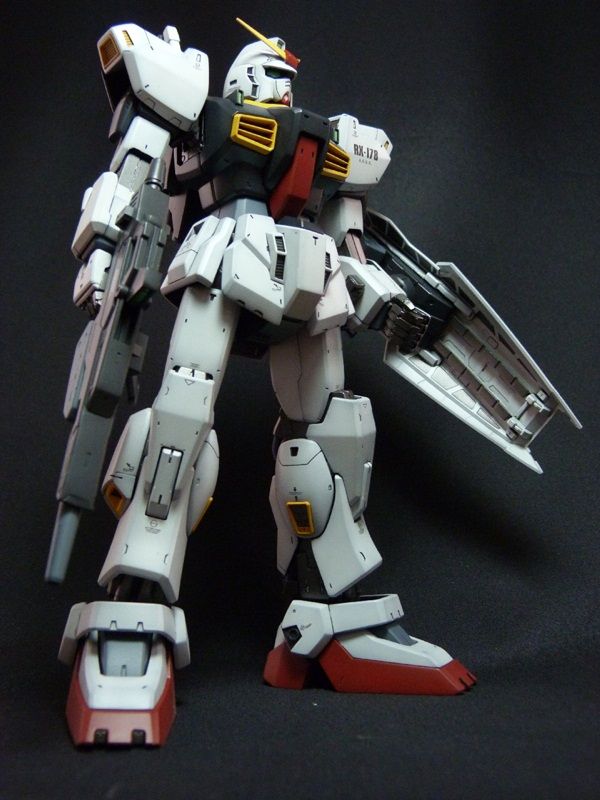
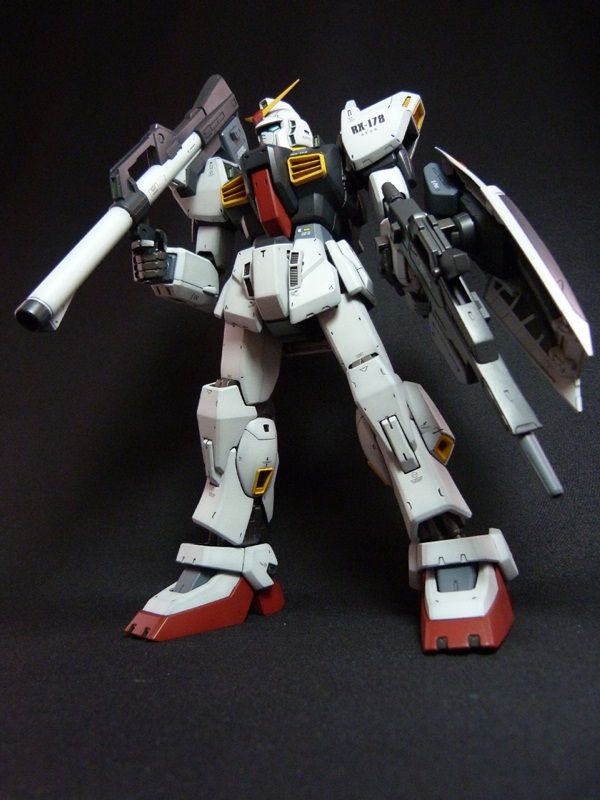
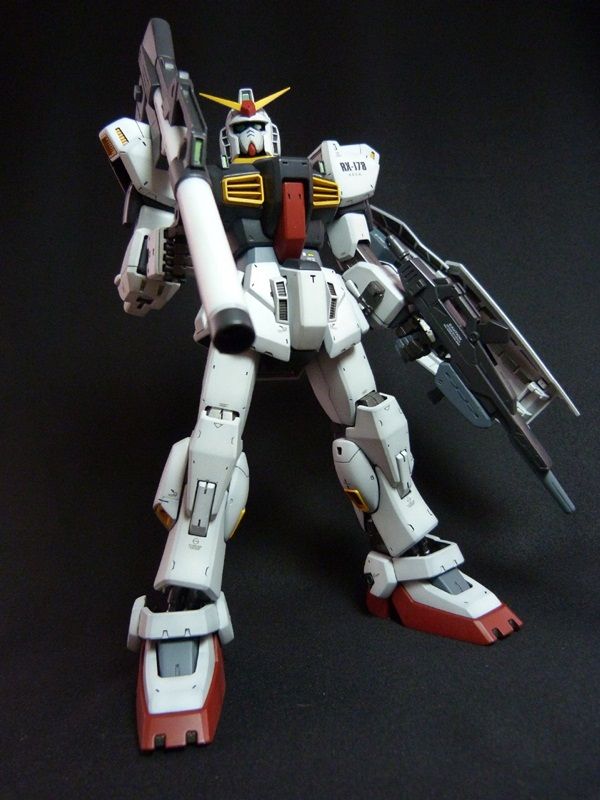
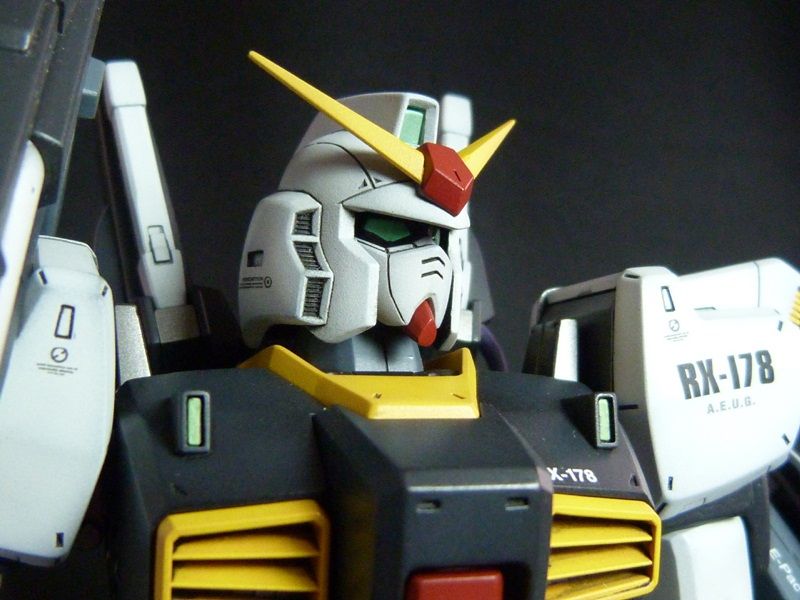
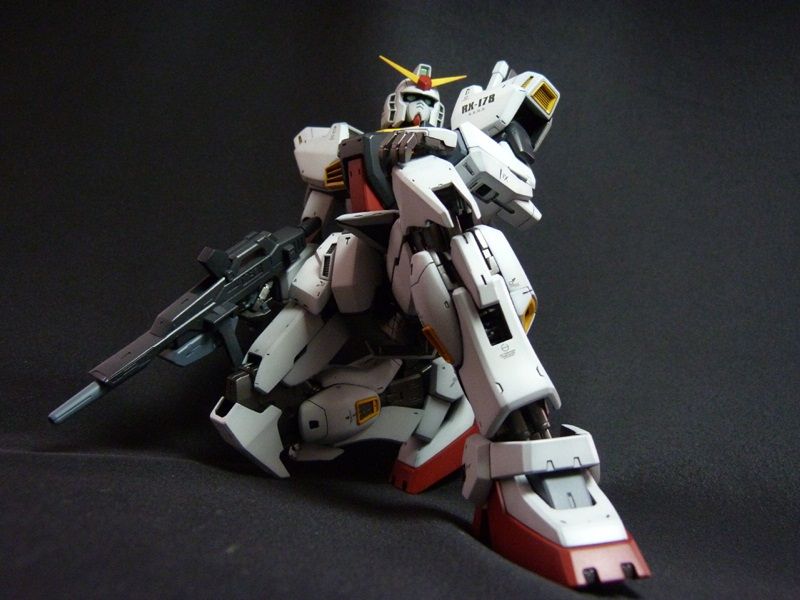
Bandai 1/100 MG RX-178 Gundam MK-II Ver. 2.0
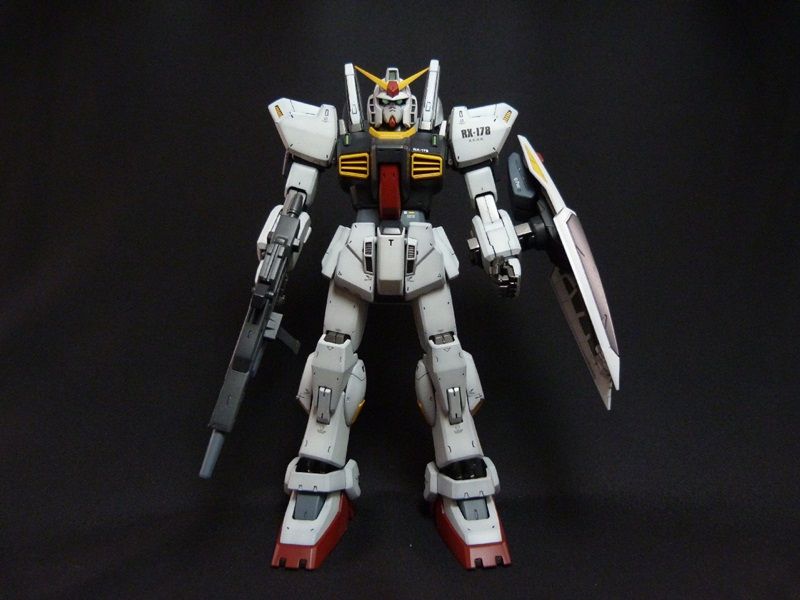
Actually I've finished building this kit 2 months back, but I haven't got the time to post it. This kit was entered for the ZeroGunz Community Female Fatale group build, which has stated that it has to be an out of the box build, which is exactly my cup of tea. Even though it is only out of the box build, I tried to improve on my modelling skill by trying to enhance the detail on this kit.

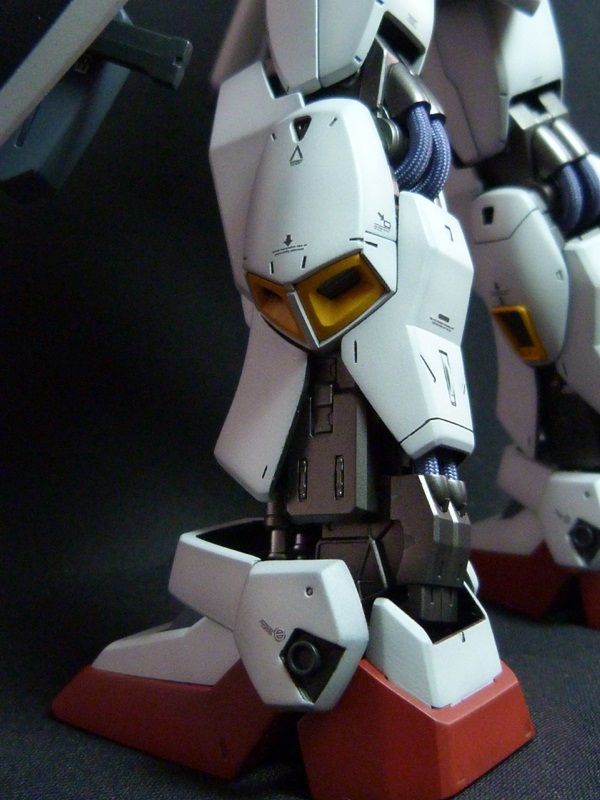
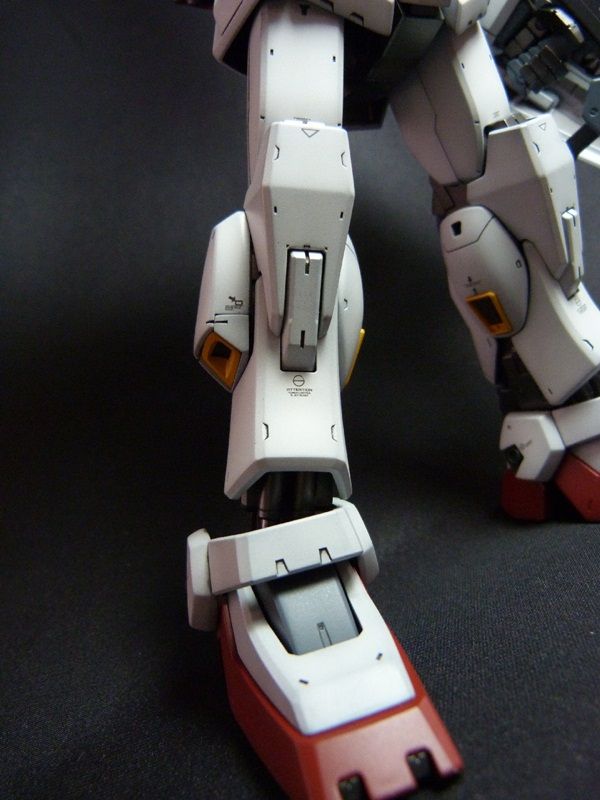
First of all, the thing that I tried to do is to add extra details to it. After some thoughts and consideration by looking at the kit itself, I find that it doesn't need much detailing to added because by itself alone it has a lot of details already with all those nicely done details on the armor itself. With that, I decided to only add a few extra panel lines that would enhance the detail a little bit, and also scribed existing mold mark & panel lines on the armor to sharpen the overall image.
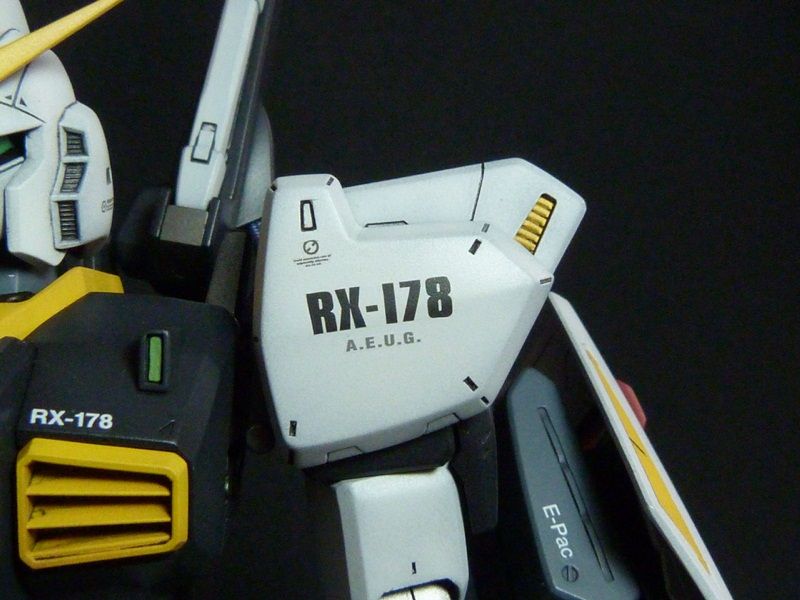
The other things that I did was using the Kotobukiya detailing parts to replace the details of the armor because those details are not really molded nicely due to the parting line. I've tried to fill in the underneath of the front skirt armor as well with epoxy putty followed by some detailing with pla-plate. Then, due to the reason that there's a lot of places where the internal armor would be exposed, I painted the inside of each armor pieces with the frame color. Lastly, since I couldn't get the Bandai water slide decal for this kit, I tried to use custom type water slide decal that I bought from a local hobby workshop for most of the kit, and also using some of the water slide decal of the old version kit, which is also from Bandai, for the marking on the shoulder.
Without further ado, here are some of the pictures that I took. I retake the following pictures for the group build organizer to create a photo booklet for all the completed kits.


Overall I'm quite happy with it. I must confess that without decal, a Gundam would indeed looks pretty dull, which is what happened with my previous Wing Gundam TV ver. build, which I should have done better with it. I'll be going to enter this kit for this year Gunpla Builder World Cup 2011, which it is going to be part of a MS deck diorama with my latest build, the MG 1/100 Zeta Gundam Ver. 2.0, which will be revealed after I'm done with the building of the whole diorama.
First of all, the thing that I tried to do is to add extra details to it. After some thoughts and consideration by looking at the kit itself, I find that it doesn't need much detailing to added because by itself alone it has a lot of details already with all those nicely done details on the armor itself. With that, I decided to only add a few extra panel lines that would enhance the detail a little bit, and also scribed existing mold mark & panel lines on the armor to sharpen the overall image.
The other things that I did was using the Kotobukiya detailing parts to replace the details of the armor because those details are not really molded nicely due to the parting line. I've tried to fill in the underneath of the front skirt armor as well with epoxy putty followed by some detailing with pla-plate. Then, due to the reason that there's a lot of places where the internal armor would be exposed, I painted the inside of each armor pieces with the frame color. Lastly, since I couldn't get the Bandai water slide decal for this kit, I tried to use custom type water slide decal that I bought from a local hobby workshop for most of the kit, and also using some of the water slide decal of the old version kit, which is also from Bandai, for the marking on the shoulder.
Without further ado, here are some of the pictures that I took. I retake the following pictures for the group build organizer to create a photo booklet for all the completed kits.

Overall I'm quite happy with it. I must confess that without decal, a Gundam would indeed looks pretty dull, which is what happened with my previous Wing Gundam TV ver. build, which I should have done better with it. I'll be going to enter this kit for this year Gunpla Builder World Cup 2011, which it is going to be part of a MS deck diorama with my latest build, the MG 1/100 Zeta Gundam Ver. 2.0, which will be revealed after I'm done with the building of the whole diorama.
Thursday, June 30, 2011
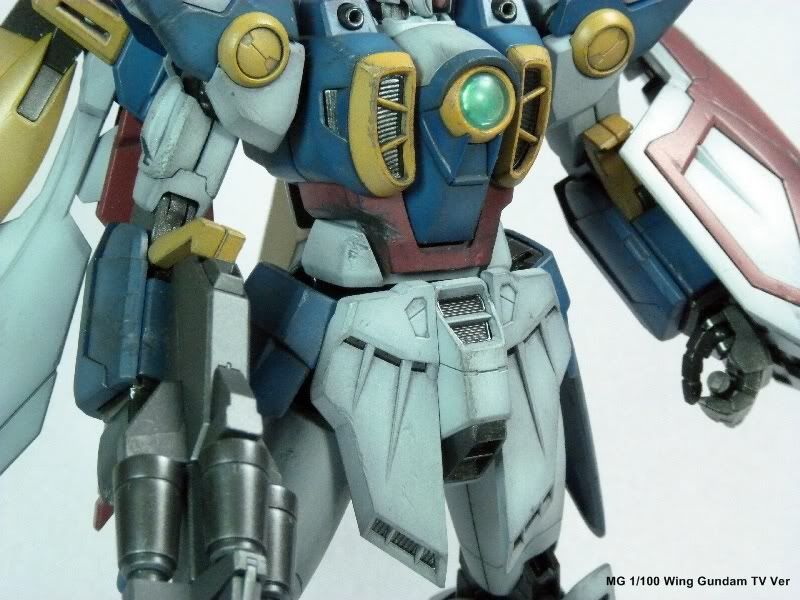
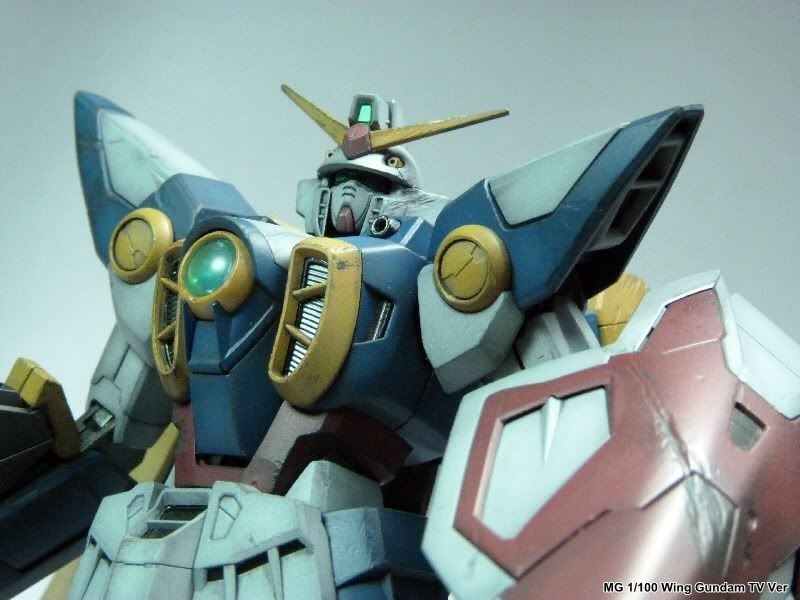
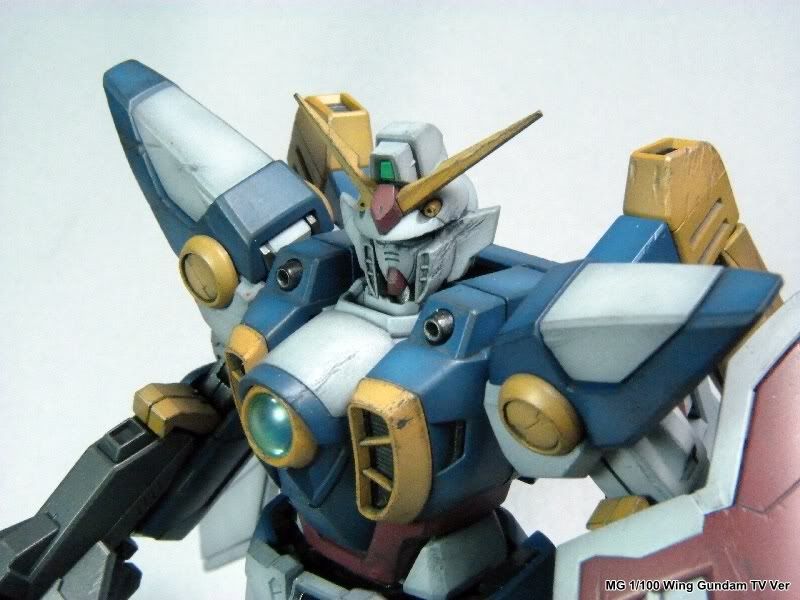
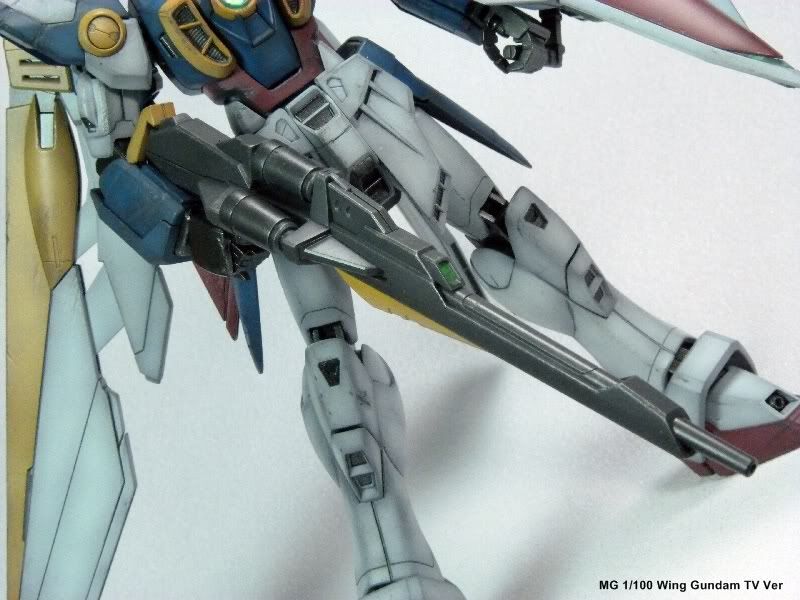
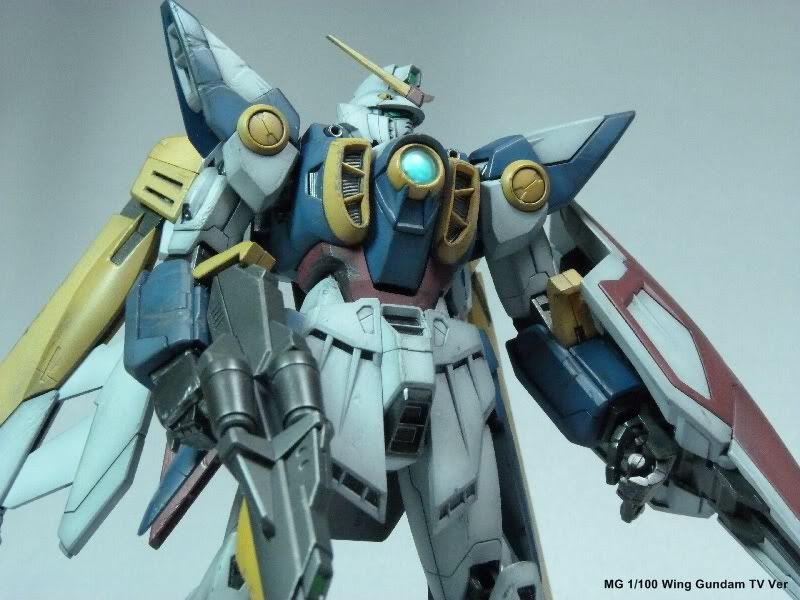
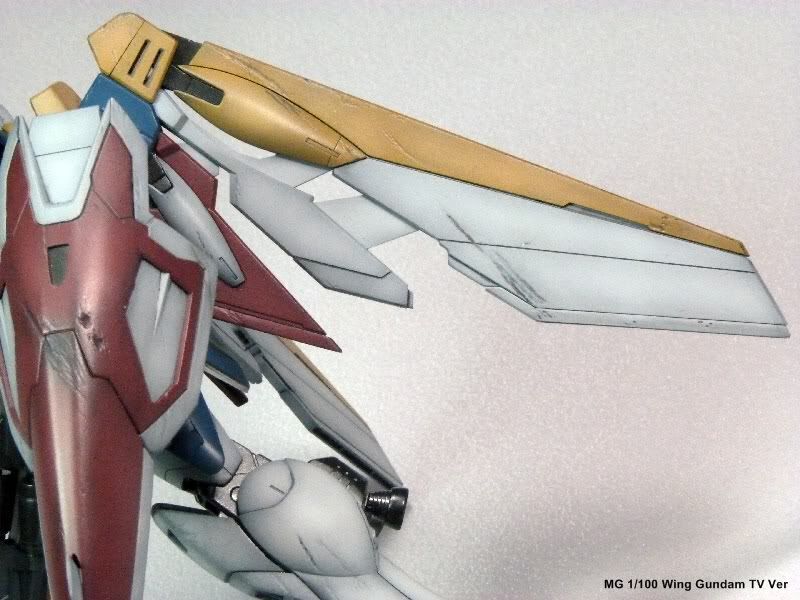
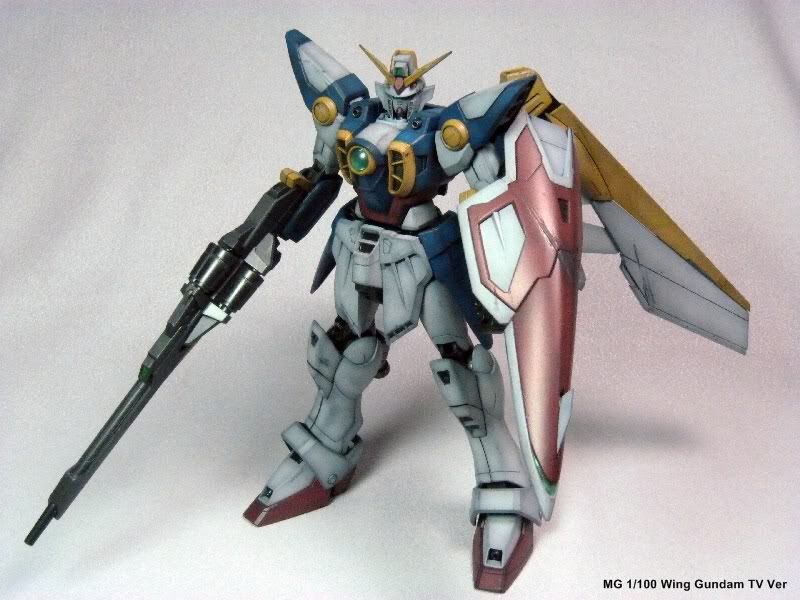
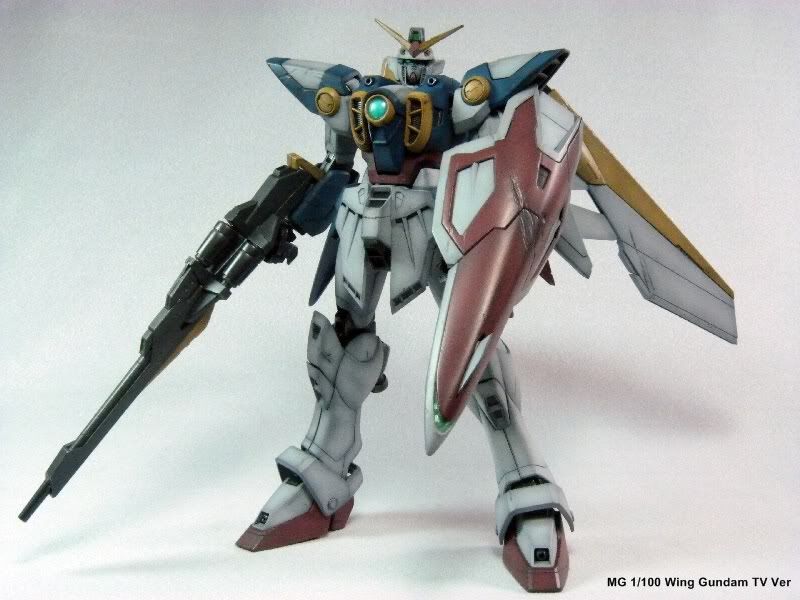
Bandai MG 1/100 Wing Gundam TV Ver
Yes, another Wing Gundam. I bought this because its mechanical gimmick. I must say that it's way much better as compare to Ver. Ka, but too bad Bandai didn't really remake the Ver. Ka. with a better frame.
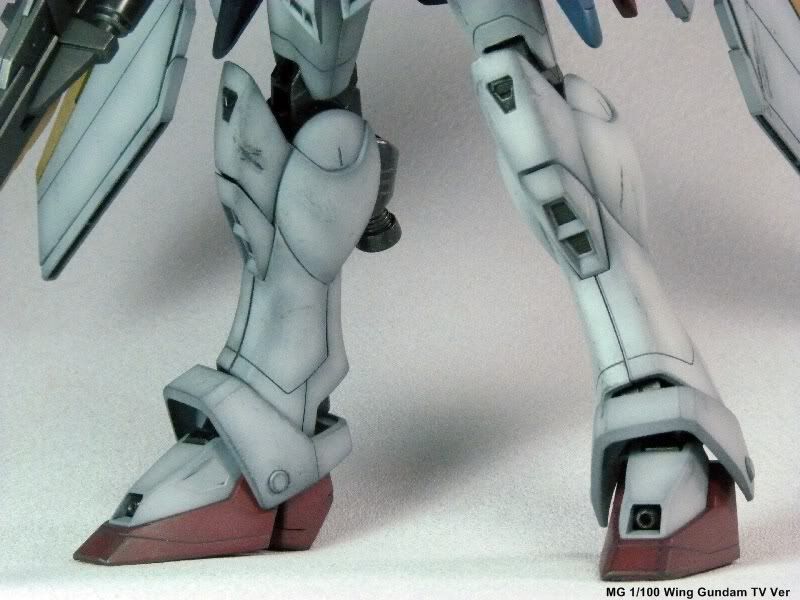
This is the build that I used to join in the ZeroGunz forum Weathering versus Metallic Group Build, of which the purpose is to learn something that has never been done before. I chose to join the weathering side because I never really did weathering before, so this is considered as my first attempt in doing it. This is where I learned how to do the battle damage, washing and dry brushing. Enough talking, let's see the picture instead.


This is the build that I used to join in the ZeroGunz forum Weathering versus Metallic Group Build, of which the purpose is to learn something that has never been done before. I chose to join the weathering side because I never really did weathering before, so this is considered as my first attempt in doing it. This is where I learned how to do the battle damage, washing and dry brushing. Enough talking, let's see the picture instead.
Subscribe to:
Posts (Atom)